Mood Balancer Project by Billy Gareth
An environment container is used in the NVIDIA Deep Learning Institute course Getting Started with AI on Jetson Nano and should be run on an NVIDIA Jetson Nano. This project is an application of the Jetson AI Fundamentals and the Jetson AI Certification Program. I highly recommend you take the full free course, and check out other self-paced online courses and instructor-led workshops available from the NVIDIA Deep Learning Institute List of Quality Programs.
Prerequisites/Requirements for this project:
The following are required to run this container and successfully complete the project
- NVIDIA Jetson Nano Developer Kit or NVIDIA Jetson Nano 2GB Developer Kit
- microSD memory card (64GB UHS-I minimum recommended) flashed with the current Jetson Nano Developer Kit SD Card image
- USB Camera such as Logitech C270 Webcam (or a CSI camera)
- USB cable (Micro-B to Type-A)
- Internet connection for Jetson Nano do download this Docker image
- Compatible Power Supply (must be 5V 4A with 2.1mm DC barrel connector if using the original 4GB Jetson Nano Developer Kit)
- 2-pin jumper (original 4GB version only)
- Optional: monitor, keyboard, and mouse
How to Use the Container
If you’ve never used Docker, we recommend their Orientation and Setup.
Remember
Classes here are two in this task: the Engrossed and the Absent minded
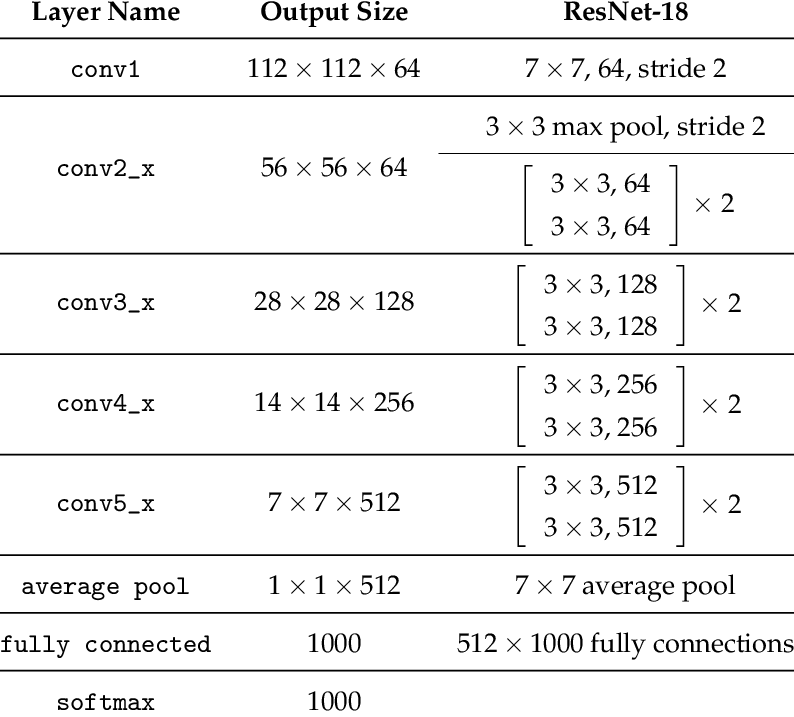
Model Specifications


Deep Learning Framework used:

Putty and Windows PowerShell
Open Putty and specify the following:
- Port - 115200
- Connection Type - Serial
- Host Name for ip address - COM3 (depending on what’s shown as configuration to the Jetson Nano Kit on your computer).
now click “Open”.
Open Windows PowerShell:
start by ssh code: ssh username@192.168.55.1
Set the Data Directory
The data collected during the course is stored in a mounted directory on the host device. This way, the data and trained models aren’t lost when the container shuts down. The commands below assume the mounted directory is ~/nvdli-data, so make sure you create it first:
mkdir ~/nvdli-data
Run the Container
Run the container using the container tag that corresponds to the version of JetPack-L4T that you have installed on your Jetson.
| JetPack Release | Container Tag | Language
|-|-| -
| 4.4 | v2.0.0-r32.4.3 | en-US
| 4.4.1 | v2.0.1-r32.4.4 | en-US
| 4.4.1 | v2.0.1-r32.4.4zh | zh-CN
| 4.5 | v2.0.1-r32.5.0 | en-US
| 4.5 | v2.0.1-r32.5.0zh | zh-CN
| 4.6 | v2.0.1-r32.6.1 | en-US
| 4.6 | v2.0.1-r32.6.1zh | zh-CN
The docker run command will automatically pull the container if it is not on your system already.
USB Camera option:
sudo docker run --runtime nvidia -it --rm --network host \
    --volume ~/nvdli-data:/nvdli-nano/data \
    --device /dev/video0 \
    nvcr.io/nvidia/dli/dli-nano-ai:v2.0.1-r32.6.1
CSI camera option:
sudo docker run --runtime nvidia -it --rm --network host \
    --volume ~/nvdli-data:/nvdli-nano/data \
    --volume /tmp/argus_socket:/tmp/argus_socket \
    --device /dev/video0 \
    nvcr.io/nvidia/dli/dli-nano-ai:v2.0.1-r32.6.1
note: if you have both CSI and USB cameras plugged in (or multiple USB cameras), also add --device /dev/video1 above. Then in the DLI notebooks, you will need to set the capture_device number to 1 (the CSI camera will be /dev/video0 and the USB camera will be /dev/video1 - don’t use the CSI camera through V4L2)
Options Explained:
- –runtime nvidia will use the NVIDIA container runtime while running the l4t-base container
- -it means run in interactive mode
- –rm will delete the container when finished
- –network host allows the container to use your Jetson host network and ports
- –volume defines a mounting directory, and is used to share the persistent data files and the CSI camera socket between the Jetson host and the container
- –device allows access to the video device
Connect to JupyterLab
When the container is launched, the JupyterLab server will automatically start. Text similar to the following will be printed out to the user:
allow 10 sec for JupyterLab to start @ http://192.168.55.1:8888 (password dlinano)
JupterLab logging location:  /var/log/jupyter.log  (inside the container)
You can then navigate the browser on your PC to the URL shown above (http://192.168.55.1:8888) and login to JupyterLab with the password dlinano. Then proceed with the DLI course as normal.
run the script
./docker_dli_run.sh and then open your Jupyter Lab and execute the notebook
Note:
- Ensure you take your own pictures with variety of behaviours to distinguish the two categories. Feel free to take as many pictures as you want, one of the differences you’ll notice will be; training will be slower since the time taken for a single epoch(pass through the dataset) will depend on the data itself, hence it’ll be long!
- Also, try and balance the number of images taken for each category
Technical Support
If you have any questions or need help, please visit the Jetson Developer Forums
License
Copyright 2020 NVIDIA
Licensed under the Apache License, Version 2.0 (the “License”); you may not use this file except in compliance with the License. You may obtain a copy of the License at
http://www.apache.org/licenses/LICENSE-2.0
Unless required by applicable law or agreed to in writing, software distributed under the License is distributed on an “AS IS” BASIS, WITHOUT WARRANTIES OR CONDITIONS OF ANY KIND, either express or implied. See the License for the specific language governing permissions and limitations under the License.
Base Image Used for This Container
Also used in this container, and with its own licensing:
Software Installed on Top of Base Image
Also used in this container, and with its own licensing: